When Mina opened her small apparel line she thought that choosing thread and machine would solve most problems. After the first sample run returned with uneven fills and blurred text she learned the hard way that the real issue lived in the digital file. The art on screen looked perfect but the stitch file told the machine to do things the fabric could not accept. After switching to specialized customized embroidery digitizing solutions her next batch stitched cleanly, required fewer stops, and her return customers noticed the difference right away.
This article explores why those specialized services matter, what a true custom approach does differently from automatic conversions, how good digitizing saves time and money in production, and practical steps designers and brand owners can take to get reliable results on caps jackets and every item in between. It also includes two helpful links to professional resources for further reading and for sourcing work that is ready for production.
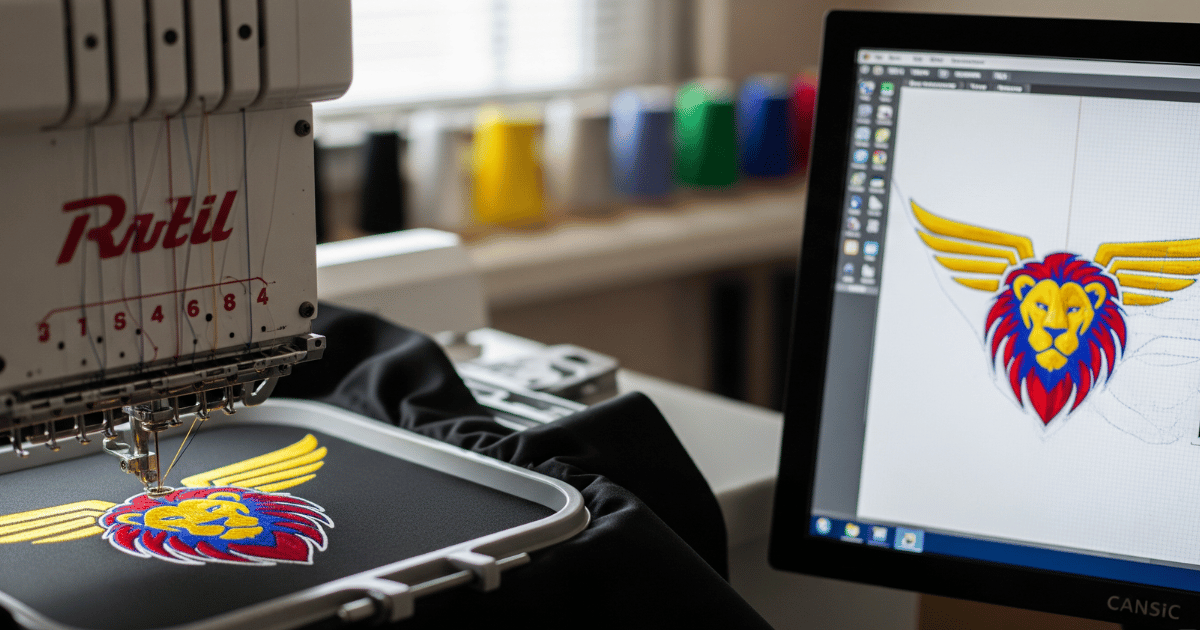
What customized embroidery digitizing solutions actually do
At its core digitizing converts visual artwork into machine readable stitch instructions. Those instructions include stitch type stitch order stitch density underlay and compensation for thread pull. Customized services do this with a deep understanding of the fabric product and the intended use. Instead of using a one size fits all conversion they adapt each file for cap crowns knit shirts fleece jackets or patches.
A good digitizer considers how thread sits on the specific substrate and plans stitch direction to manage shine and texture. They decide where to use satin stitches and where to use fills. They add underlay where the top stitches need support and they apply pull compensation so letters do not narrow after stitching. This level of planning is what turns art into repeatable production.
Why custom work beats auto tools every time
Automatic digitizing tools are tempting because they are fast and cheap. However those tools cannot foresee production realities. Auto generated files often result in excessive density or awkward stitch directions. They may leave too many jump stitches or fail to include a necessary underlay. The result is poor edge definition visible gaps or an embroidered piece that looks nothing like the art.
Custom embroidery digitizing adds human judgement to the process. An experienced digitizer will simplify tiny details that cannot be reproduced with thread choose the correct stitch types and sequence the stitching to minimize trims. That human input prevents common failures and improves the look and durability of the final product.
How a typical custom digitizing workflow looks
A professional workflow follows a set of repeatable steps. First the artwork is checked and cleaned. Vector formats like AI or EPS are preferred because edges remain sharp. If only a raster image is available the digitizer will trace and clean the artwork.
Next the image is segmented into stitch types. Small thin strokes might be converted to running stitches while bold outlines may become satin columns. Then underlay layers are added to stabilize stitches. Density settings are tuned to the fabric weight and thread type. Pull compensation is calculated for tight letters or small shapes. The file is sequenced so that trims and color changes occur in an efficient order. Finally the file is exported into the requested machine formats.
Many digitizers will run a low speed test stitch on the intended fabric and adjust settings if needed. This test phase prevents costly full run errors.
Practical benefits for production teams
Using a custom file reduces stops caused by thread breaks. It lowers reject rates and shortens average runtime for each piece because unnecessary trims and jump stitches are removed. For shops that run multi head machines consistency matters most. A single optimized file that performs well across heads means less monitoring and less operator time per piece.
From an accounting perspective improved digitizing reduces wasted blanks and minimises overtime. That makes the initial cost for a custom file a sound investment rather than an extra expense.
Design tips to make digitizing smoother
Good preparation speeds the process and reduces revisions. Follow these simple rules:
- Provide vector artwork when possible
- Avoid extremely thin text under 10 millimeters in height
- Simplify gradients into blocks of color or use applique where detail is needed
- Specify final stitch size and intended substrate upfront
- Mention if you plan on using foam chenille or applique
These small clarifications help the digitizer recommend the correct stitch type and underlay strategy on the first pass.
Fabric specific considerations
Different materials require different strategies. Caps have a curved crown and often a seam near the center. This requires stitch path planning that avoids pulling toward the seam. Knits like polo shirts stretch and need lighter density underlays to prevent puckering. Towels and terry need more open stitch structures to avoid excessive thread nesting.
A custom approach accounts for these differences and produces a file that works on a real product rather than a digital mockup.
Pull compensation and why it matters
Pull compensation ensures that thin letters do not close up during stitching. Thread pulls fabric toward the center of a stitch and can narrow letterforms. Digitizers compensate by slightly widening the outline or by adjusting stitch angles. Without compensation text that looked fine in vector form can become illegible after stitching.
Underlay choices explained
Underlay provides a stable base for top stitches. On lightweight fabrics underlay prevents sinking and on heavy fabrics it helps create a uniform surface. Digitizers choose between various underlay styles depending on the design and fabric. The wrong underlay can cause either puckering or excessive stiffness so this is a key decision in the file creation.
Sequencing and efficiency
Stitch sequencing reduces trims and travel stitches. Efficient sequencing also reduces machine head travel which in turn reduces skipped stitches or tension issues. A well sequenced file keeps color changes efficient and prevents the operator from having to stop the machine to fix problems.
File formats and machine compatibility
Different machines accept different formats. Industrial machines commonly accept DST while home machines may need PES or EXP. A good digitizing provider exports in multiple formats and keeps the stitch structure intact during conversion. This ensures that the pathing and stitch order remain consistent.
When to choose applique or hybrid approaches
Some details are impossible to translate into thread. Photographic detail and micro gradients are examples. In these cases applique or a hybrid method works better. Applique places fabric for large color blocks and then covers edges with satin stitches. This preserves detail and reduces stitch density in complex areas.
Quality checks to request
Ask your digitizer for a stitch sheet which shows stitch count stitch types and sequence. Request a production note that suggests needle size backing type and machine speed. If possible ask for a low speed proof stitch on a sample of the intended substrate. These checks catch issues that only appear at production speed.
How good digitizing reduces returns and complaints
When logos and branding stitch consistently customers notice. Apparel with legible logos and clean edges reflects well on the brand. Poor embroidery looks cheap and can lead to returns. By investing in a stable digitized file a company avoids refunds and negative reviews.
Cost considerations and return on investment
Some business owners balk at digitizing fees. But a simple calculation helps. Compare the digitizing fee to the cost of one wasted blank garment. If one returned garment costs more than the digitizer fee then the file has already paid for itself with the first corrected run. Over multiple runs the savings compound because the same file can be reused.
Case example that shows impact
A small team ordered 300 caps with a narrow serif logo using an auto generated file. After the first batch many letters were unreadable and half the hats needed rework. They then ordered a custom digitized file and reran the job. The second batch matched the design and the wasted hats were reduced to near zero. The cost of the custom file was recovered in reduced waste and faster production.
Communication with your digitizer
Clear instructions speed edits. Provide final artwork size substrate color family and intended machine head count. If you have specific wash requirements tell the provider so they can recommend stabilizer and stitch density. Consolidate feedback in one response to speed revision cycles.
Storage and reuse of master files
A master digitized file is an asset. Keep it backed up and label files with size and substrate so reorders are quick and reproducible. Proper file management avoids duplicating work later.
When complex techniques require special attention
Special techniques like chenille puff or heavy applique need extra planning. Foam or puff requires trimming allowances and tack placements that are different from flat stitching. For these jobs a digitizer will often request the foam thickness or the specific machine type to ensure the file runs correctly.
How to evaluate digitizer samples
When you receive a test stitch inspect edge quality pile uniformity and the back of the piece for tidy trim management. Check legibility of small text and perform a wash test if the item will be laundered often. If you see pulling or inconsistent pile height ask for density and underlay adjustments.
One trusted source to consider
For many businesses looking for a structured approach to file preparation one provider that is often chosen for practical work and clear production notes is True Digitizing. They show how a disciplined digitizing process reduces production surprises and supports repeatable results.
Quick checklist before you order a file
- Send vector artwork when possible
- Include final size and substrate details
- Note any special effects like puff or chenille
- Ask for production notes and sample proofing options
- Request file exports for the exact machine formats you need
Final practical tips for smaller shops
If you run a small shop test one file before committing to a large order. Use consolidated feedback to speed revision cycles. Keep a library of master files and reuse them for future runs to save time.
Closing thought
Good digitizing is invisible in the best way. When the file is right the embroidery looks effortless and consistent. When it is wrong every problem in the production line becomes visible and costly. Investing in a careful custom file makes production predictable reliable and repeatable in ways that matter to customers and to the bottom line.
Will you try custom embroidery digitizing to improve your next production run?